Wearable Planter

Jewelry and Accessories for Green Thumbs

DIY

How to Shop for Healthy Succulents and Cacti

How to Plant, How to Shop for Plantscolleen jordanComment
FullSizeRender.jpg

When you’re shopping for succulents, there are several signs to look for to make sure you are buying the healthiest plant that you can get. There are no definite rules on what to look for when shopping for plants, but these tips will help you determine which plants are the healthiest when you’re out shopping. This post is part of a 3 part series on how to shop for succulents. In this post I’m going to focus on signs of healthy plants, and in the next two posts I will share with you warning signs of unhealthy or uncared for plants, and what to never buy.

Plump and Full Leaves

FullSizeRender.jpg

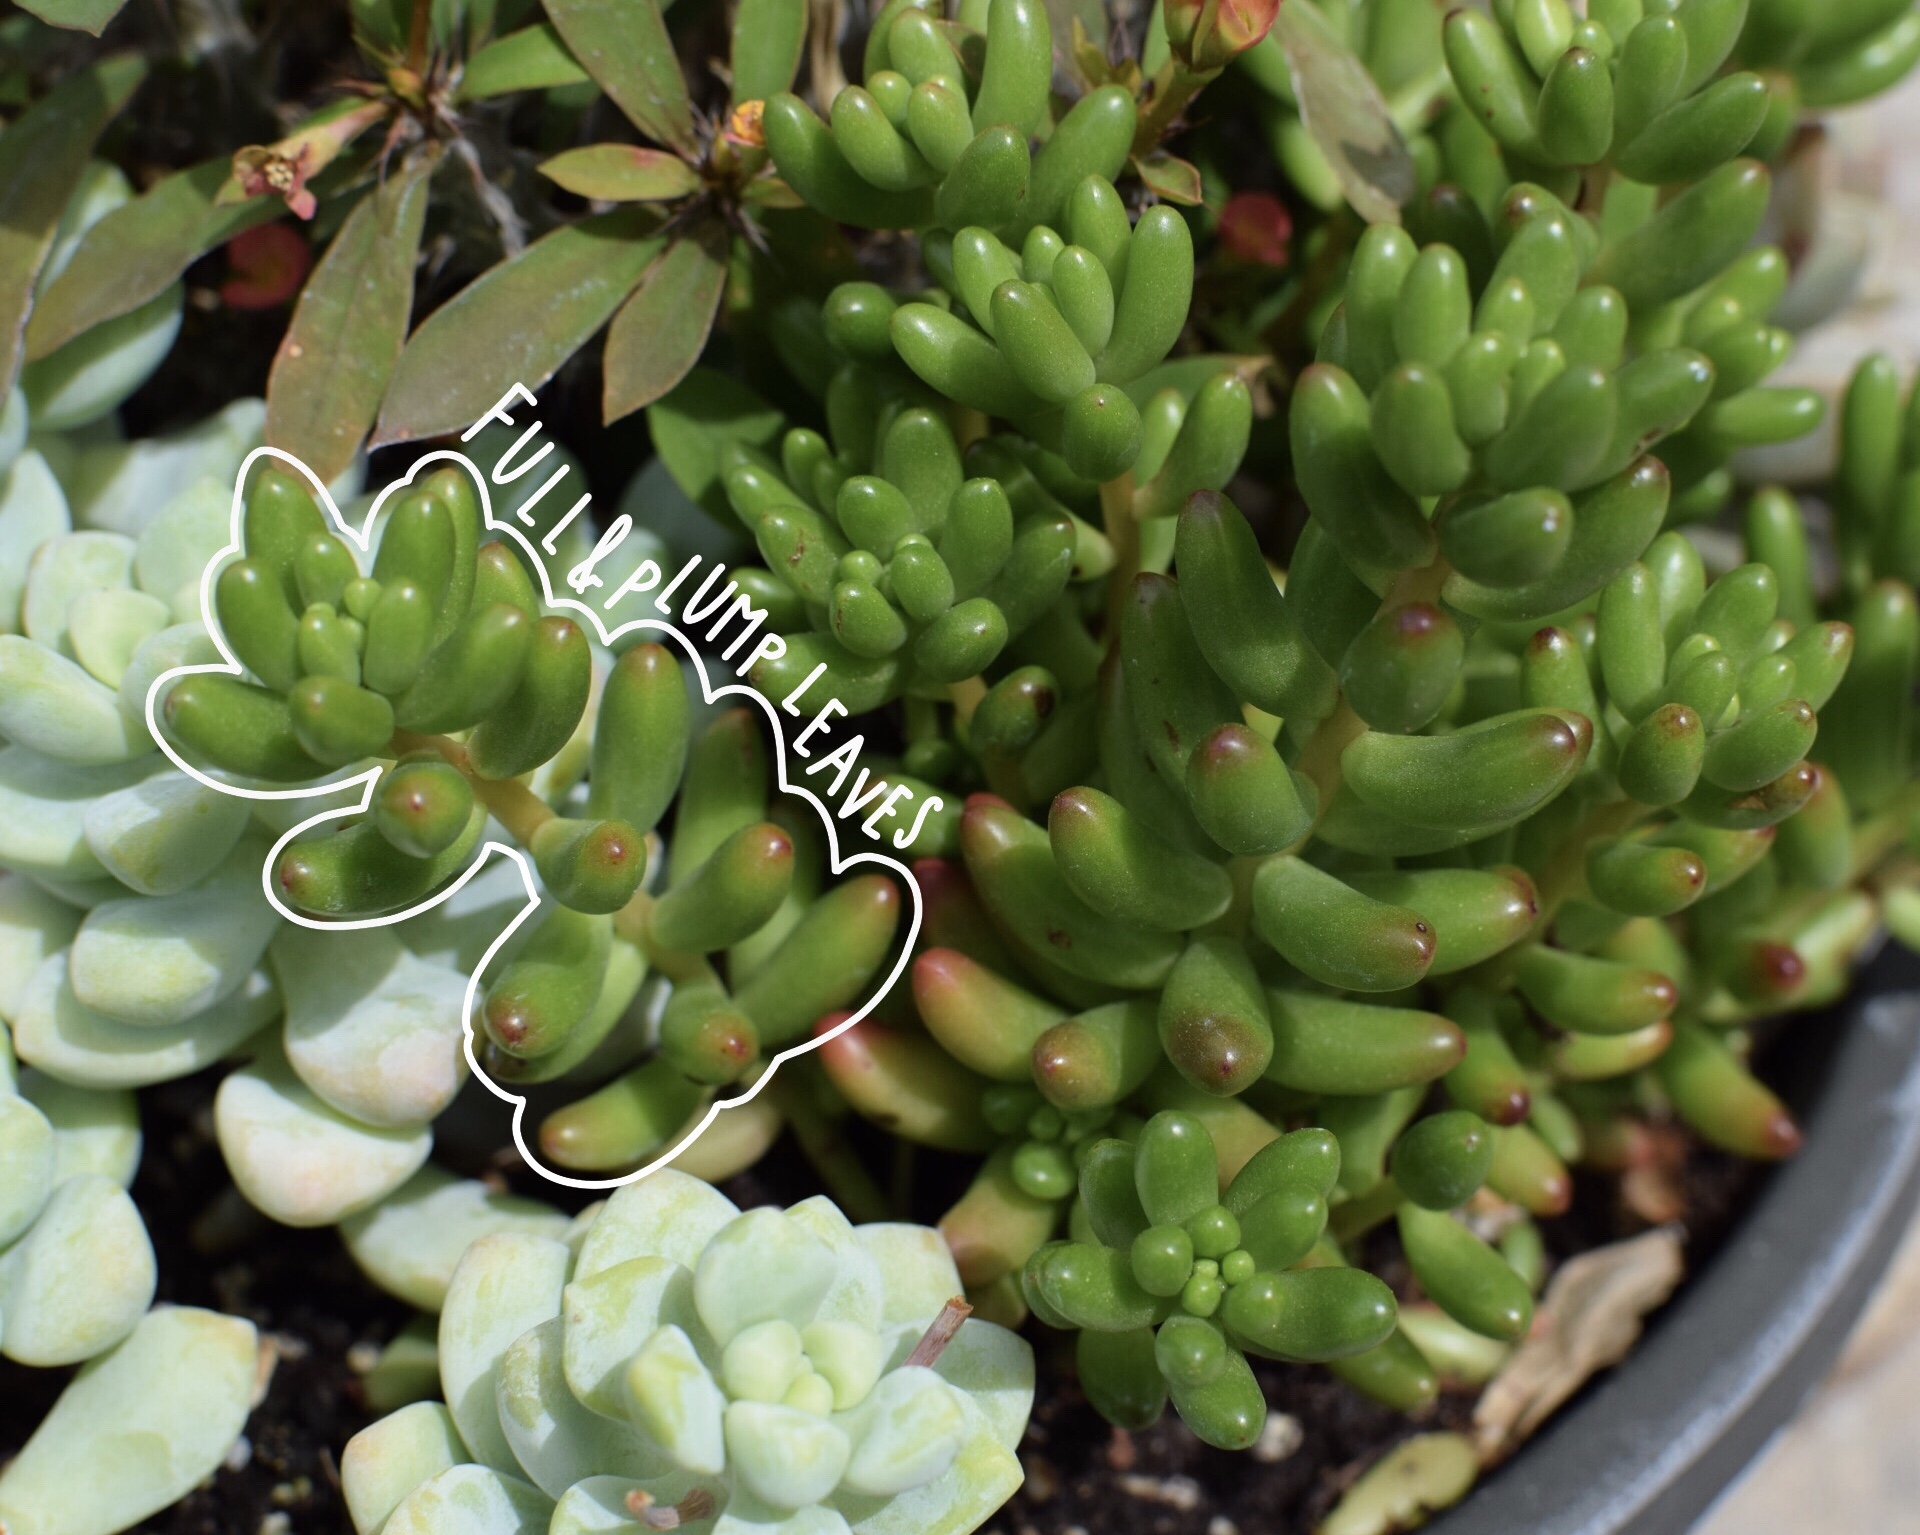
Looking at the leaves is one of the easiest ways to tell if a succulent is healthy. Succulents are often called “fat plants” because of their plump and full leaves. Succulents store their water in ways different from most plants by storing most of their water in their leaves. The appearance of the leaves will give you a status report of the recent health of the plant. If the leaves are full and plump, than the plant is currently getting the right amount of water, and unless there are signs of insects or physical damage, the plant is in most likelihood currently healthy. If you see mushy or black leaves on a succulent, the succulent was overwatered and will most likely die soon (seriously, don’t buy an overwatered succulent, it will only lead to heart break). Wrinkly leaves mean that the succulent has not received enough water. Succulents with wrinkly leaves can still be healthy and plump back up in a few days when properly watered.

Close Leaf Spacing

IMG_0483.JPG

We’re going to keep looking at the leaves for more clues about the health of the plant. Looking at the leaf spacing will give us clues about the longer term growing conditions of the plant. When you’re looking at the succulent you want to buy, pay attention to the spacing of the leaves along the stem. Leaves should be closely spaced together and tightly overlapping. Etiolation, or the far apart spacing of the leaves, is a sign that the plant has not received enough sunlight. Etiolation on a succulent is not a sign that it is unhealthy, just that it was not receiving enough sunlight for a portion of its life. You can buy an etiolated succulent and still have a perfectly healthy plant, it just might not be “instagram-worthy” right away. If you do buy an etiolated plant you can also cut off the bottom of the plant and remove the lower leaves to propagate smaller plants.

Dry Soil

IMG_0489.JPG

When you’re shopping for succulents, you’ll also need to look at the soil for clues about the health and care of the plant. If the soil is dry and you don’t see any signs of mold or mushy leaves, than the plant has never been properly watered and you should have healthy roots and soil. If you see soft wet soil or any signs of mold or mushy leaves on the plant, this means the plant has been overwatered and can cause root rot, a condition where the roots stayed wet for too long and have begun to rot and cut off water to the plant. 

Also, look for succulents planted in a well-draining soil mix that includes perlite or sand. If you don’t see these in your soil, but the soil is still dry, you can always replant it with a fast draining soil mix when you get home.

Bright and Even Coloring

IMG_0484.JPG

 The coloring of the leaves will also give you more clues about the health of the plant. Not all succulents are green or brightly colored, but look for even coloring of the plant. Some succulents might be light green, dark green, pink, purple, or even black, but what matters is that the leaves all have consistent and even coloring. Some species will also have a gradient in their leaves (like the succulent in the picture) where the color might change color towards the tips. As long as the coloring doesn’t show signs of sunburn or stress, and is consistent throughout the plant, this color is a sign of good health. 

Farina Bloom

IMG_0485.JPG

 Farina bloom is a light, dusty, sometimes waxy, flour-like coating over the leaves of some succulents. Not all succulents have farinaceous bloom, but several species of crassula, pachyphytum, and echeverria do. If you see a flour-y coating on the leaves of the succulent, make sure that it is mostly undisturbed and has not been dusted off. Farina acts like sunscreen for succulents who love bright sunlight and should not be removed. The farina bloom is something that occurs on the leaves as they grow, so once its been removed it cannot grow back. If this has been removed, it does not mean that your succulent is going to die, but you should take more caution in the amount of light it receives and pay attention for signs of sunburn. Leaves that have had the farina removed could still be used for propagation of new plants.

I hope you liked this guide of what to look for to ensure you’re buying healthy plants! The next part of our series will focus on what to avoid when buying succulents, and will give you more tips and photos of what to look out for when buying plants and signs that some plants might need more love.

DIY Holiday Presents for the Last Minute Maker

DIYcolleen jordanComment

Our deadline for ordering in time for December 24th delivery has now passed, but if you're still looking to give someone a gift we designed, you still have to make one yourself!

Over the years we've put several of our projects and DIY projects on Thingiverse and Instructables to share for free for anyone to make. We've rounded up a few of our projects for you to make if you're still looking for that perfect gift. These projects will each take about a few hours to make, but no longer than an afternoon (with time for snack breaks of course!). For some of the projects, you will need access to a 3D printer, so see if you have access to one at your local library or maker space if you don't have one already!

Make Your Own Seed Bombs
Use recycled paper and some wildflower seeds to make your own seed bombs. For this project you'll need access to a blender and optionally an ice cube tray to use as a mold. This project will take less than an hour to complete, but will need to dry overnight.

Hexagon Succulent Planter
One of our newest projects! 3D print one (or more) of these small succulent planters as a gift! The planters look great on their own, but they tesselate well to make a small desk garden! This project will take you about one hour each per planter to 3D print, with an additional 5-10 minutes for planting.

Wearable Planter No. 2 Necklace
Give some jewelry! Print one of these necklaces from files found on our thingiverse page, and create your own planter jewelry! Printing takes a little less than an hour, and another 5-10 minutes for planting. Finish your new necklace off with a leather or waxed cotton cord.

Little Little Free Library
Last year we published files for you to 3D print your own Little Little Free Library. 3D printing this takes about 2 hours, with about an additional 10 minutes for assembly. You'll need some super glue or hot glue to assemble this library together. Bonus points if you add some small 1:1 scale size dollhouse books!

How to Make a 3D Printed Light-Up Marquee Sign

DIYcolleen jordanComment

Today we wrote a new DIY guide for you! If you like marquee signs, and want to try an easy 3D printing project, we created a tutorial on Instructables for you to make your own 3D printed light-up marquee sign!

This tutorial can easily adapt to your skill level with 3D printing and electronics. If you're a beginner, you can follow the directions to create the sign and learn some new skills. If you already know what you're doing, we show you the basics of this project and give you to improvise to make your sign more complex!

To learn what to do, visit our how-to on Instructables. There are pictures accompanying each step to show you what to do.

Have fun making!

Make your own felt mistletoe

DIYcolleen jordanComment
mistletoe-1-6.jpg

It's the holiday season, which means its time for decorating and bringing some cheer to your house! To start our decorating for the holidays, we decided to make some mistletoe out of felt. If you're looking for a non traditional look, or are worried about allergies, you can make this mistletoe to bring some cheer to your holiday party or decorations! Since this mistletoe is made out of felt, you can keep it to use for years to come.

The traditions around displaying greenery and evergreens indoors around the winter solstice goes back millenia. In the 1st century A.D., the Celtic Druids saw this plant that bloomed and remained green in the cold as a symbol of vivacity and fertility. Overtime, mistletoe evolved into a holiday decoration, with a berry plucked from it every time there was a kiss beneath it. Today we hang mistletoe in our houses as a holiday decoration and to brighten up Christmas parties.

This DIY is really easy to do, and if you have all of the materials on hand, it will probably take you less than 20 minutes from start to finish. If you don't have all of the materials on hand, you can probably find them all for less than $5 at your local crafts store, so it is an inexpensive activity, too. If you're looking for an activity to do with children, this could probably be done by tiny hands, with only minimal help with the hot glue.

Step One: Gather your supplies

To make this felt mistletoe, you'll need:

  • Green and white felt. We used 100% wool felt (also called fancy felt). You might not be able to find this at your local craft store, but you can find it in a large assortment of colors on Etsy.
  • Cotton twine or cord
  • scissors
  • 4"-6" long sticks or branches. We cut ones left over from a flower arrangement.
  • hot glue and glue gun or tacky glue
  • Red or green ribbon to tie the mistletoe together. We used red and white baker's twine since it's what we had on hand, but you can use any ribbon that you'd like.

Step Two: Make your branches

We started by making the branches for our mistletoe. First we glued the branches together to create forking branches and to keep them secure. We finished them off by wrapping the tops of them with the cotton cord. This hides the glue and makes them look more finished.

Step Three: Cut out your leaves

Cut out the leaves from your felt. We cut out leaves in two shapes, an oval shaped one, and one shaped like cat's meow glasses. Don't worry about making the shape of each one perfect. We've included a template for you to see the shape of the leaves that you can print out if you need a guide. We cut out six smaller leaves and one longer leaf per branch, but you can cut out and use as many per branch as you see fit.

Step Four: Glue leaves onto branches

Next, we glued the eyeglass shaped leaves to the end of the branch. Place a drop of glue at the end of the branch, and wrap the felt around the tip of the branch. Pinch the felt and the branch together for a few seconds to secure the bond with the glue.

From there, glue the smaller petals, pointing slightly downward, up the branch. Alternate sides with every other petal. Repeat for each branch.

While working on this DIY, we found some white felt. To make the mistletoe look more realistic, we cut out some small circles from the white felt, and glued them in a few places on each branch to mimic the berries found on some types of mistletoe.

Step Five: Glue Branches Together

Once you've added the leaves to each branch, decide how you want your branches to sit together. We glued them together to secure them in place.

Step Six: Tie ribbon around the mistletoe

You're almost done! Tie your red ribbon around where your branches meet. Et Voilà! You've just made your own mistletoe! Hang it from your doorway, and you're now ready for your holiday party!

If you liked this tutorial, we have more tutorials here on our blog and Instructables page for you to enjoy. We learned about the history of the mistletoe from the Smithsonian magazine and the History Channel.

Make Your Own String Art

DIYcolleen jordanComment
stringart-15.jpg

Step 1: Gather Your Tools and Materials

Gathering your tools is always the first and most important step of any DIY project. For this project you're going to need:

  • a wood board or plank
  • masking tape
  • a hammer
  • a lot of small nails (you'll need at least 100. For two signs we used 3 packs of XX nails)
  • embroidery floss, yarn, or thread (we used embroidery floss)
  • Access to a computer with a printer and Adobe Illustrator (optional, but highly recommended)
  • Optional: Paint pen (to paint the tops of nails)

Step 2: Outline Your Sign

Whether you're making a sign with text or an image, you'll want to outline your sign first. For this I used Adobe Illustrator, but you can use the vector image software of your choice, like Inkscape.

First I outlined my words with a thin black line. I made a copy of that text over the first version, made it into the dashed line to mark where the nails should be. This step is optional, but will save you a lot of time in determining where your nails should be placed. Once you're happy with your image or text and nail outline, print out your file.

Step 3: Tape your Overlay Onto your Sign

Tape your printed overlay onto your sign. We used masking tape to hold the printed overlay in place. Nail your nails into the marked points on the sheet.

Step 4: Riiiiiip

Rip off your stencil from the board. This step is really satisfying. Don't worry if there are any small bits of paper left, you can remove those with tweezers. If they're left they won't really be visible in the final project.

stringart-1.jpg

Step 5: Outline your letters

For each letter, start by tying a double knot around one nail of each letter.

Next wrap around the outline of the letter.

Fill in the letter by zig-zagging through he points in the letter. Do this until it looks complete or thick enough to you.

Tie off the string for that letter with another double knot. Cut off any excess string. If you have a paint pen in the same color as your string, paint the tips of the nails to make your sign more legible or "pop" more.

Repeat this process for all the letters or images in your sign. You're probably going to be looking at the sign from a few feet away, so don't stress out about every detail of this being perfect. Embrace your mistakes!

Step 6: Show off your work!

Congratulations! you've finished this (moderately time consuming) DIY project, so show off your work! We added hooks to the back off our sign and nailed it to the wall, but this craft could be displayed on a bookshelf or countertop, too.