Wearable Planter

Jewelry and Accessories for Green Thumbs

DIY

HOW TO PLANT CUT SUCCULENTS

DIY, How to Plantcolleen jordan2 Comments

Succulents are really easy plants to care for. They're not only easy to keep alive with just a little bit of water and access to sunlight, but they are also simple to plant. Succulents can thrive indoors year-round and can live outdoors in most climates. The easiest way to grow and propagate these plants isn't through planting seeds, but by taking cuttings from established plants. Planting them yourself gives you better creative control over how your arrangement looks, and is an inexpensive introduction to gardening that you can do without access to a backyard or porch. If you've ever been curious about how to plant your own succulents, you're in luck because we're going to show you what to do!

What You'll Need:

  • Succulent cuttings or leaves. If you don't have them from a cutting you took, you can get them from Amazon and several sellers on Etsy.
  • A well-draining soil. For this tutorial I'm making my own using 1 part potting soil mixed with 1 part sand, but you can also buy pre-made soil mixes made for succulents and cacti.

  • A planter or tray to plant in.

  • Water.

  • Small river stones  or rocks (optional).

SHOP POST.png

What To Do:

Gather Your Succulents To Plant

We're going to be planting a variety of types of succulents from both cuttings and fallen leaves for this tutorial. Gather together what you would like to plant. You can either clip cuttings from an established plant or use fallen leaves. You can also find cuttings at most florists and online if you can't find them elsewhere. I purchased mine from a seller on Etsy, but you can find them on Amazon, too.

Prepare your succulents for planting.

Preparing your succulents is the most important part of this process. You want to make sure that you have enough of the stem to plant beneath the soil to support the plant. Remove any extra leaves from the bottom of the stem. For larger cuttings, about an inch of bare stem is fine, and you can use less for smaller cuttings. 

Next, look at the bottom of your cutting. The plants should have a "callous" on them, meaning that the bottom of the plant has dried out. This forms a few days after cutting the succulent, so you should wait a few days before planting freshly cut succulents. You can speed up this process by leaving the cutting on a paper towel or paper bag for the end to dry faster.

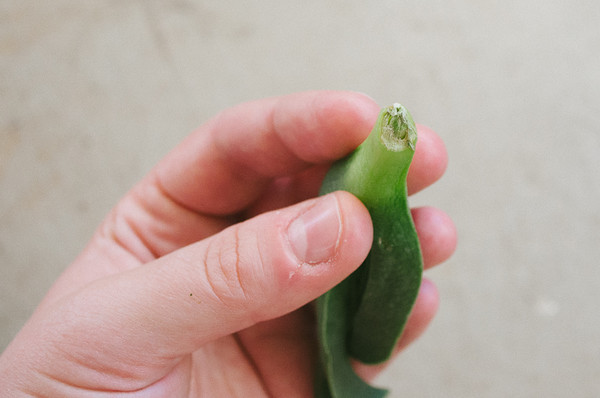
The great thing about succulents is that you can plant their leaves, too, so save the leaves you removed from the stem. Check for rotten parts of your succulents. Any part of the plant that is black has rotted, and this can spread to other parts of the plant and will eventually kill it. The rotten portions can be removed simply by cutting it.

Mix your soil.

5.jpg

If you're not using a pre-mixed blend of soil for succulents, you'll need to prepare your soil so that it will drain well to allow your succulents to thrive. I mix one part potting soil with one part sand, which allows the soil to drain well. I also like to keep some small rocks on hand to place around the base of larger plants to help anchor them in the soil.

Pour your soil mixture into a pot or tray. I'm recycling a baking pan that I can no longer use for baking as a planting tray.

Plant!

Now we've gotten to the fun part! Make a small hole in the soil, about an inch deep. Place your cutting into the depression, and cover with soil.

7.jpg

If you're planting more than one cutting, make sure to place them about 2-3" apart.

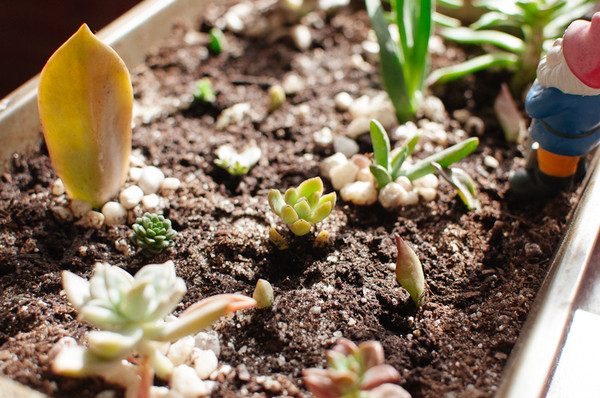
Make sure your plants get enough water. Succulents don't usually need a lot of water, but while they are establishing their roots, you'll need to water them every 2-4 days, depending on how dry the soil gets. Don't be surprised if you see the leaves start to look a little dried out at first, this is the plant using it's stored energy resources while it builds new roots. In about four weeks you'll start to see new growth. Once the plants have established their roots and begin to grow, switch to weekly watering or only when the soil is dry.

Admire and Show Off Your Work!

Great job! Show off your green thumb and your amazing handiwork to all your friends! Once these plants have established their roots and started growing in about 3-6 weeks, they'll be ready for repotting if you choose. Plant them in a small mason jar or colorful pot, and they make a great holiday gift for coworkers and friends!

READ MORE ABOUT SUCCULENTCARE.png

DIY Holiday Presents for the Last Minute Maker

DIYcolleen jordanComment

Our deadline for ordering in time for December 24th delivery has now passed, but if you're still looking to give someone a gift we designed, you still have to make one yourself!

Over the years we've put several of our projects and DIY projects on Thingiverse and Instructables to share for free for anyone to make. We've rounded up a few of our projects for you to make if you're still looking for that perfect gift. These projects will each take about a few hours to make, but no longer than an afternoon (with time for snack breaks of course!). For some of the projects, you will need access to a 3D printer, so see if you have access to one at your local library or maker space if you don't have one already!

Make Your Own Seed Bombs
Use recycled paper and some wildflower seeds to make your own seed bombs. For this project you'll need access to a blender and optionally an ice cube tray to use as a mold. This project will take less than an hour to complete, but will need to dry overnight.

Hexagon Succulent Planter
One of our newest projects! 3D print one (or more) of these small succulent planters as a gift! The planters look great on their own, but they tesselate well to make a small desk garden! This project will take you about one hour each per planter to 3D print, with an additional 5-10 minutes for planting.

Wearable Planter No. 2 Necklace
Give some jewelry! Print one of these necklaces from files found on our thingiverse page, and create your own planter jewelry! Printing takes a little less than an hour, and another 5-10 minutes for planting. Finish your new necklace off with a leather or waxed cotton cord.

Little Little Free Library
Last year we published files for you to 3D print your own Little Little Free Library. 3D printing this takes about 2 hours, with about an additional 10 minutes for assembly. You'll need some super glue or hot glue to assemble this library together. Bonus points if you add some small 1:1 scale size dollhouse books!

DIY Friday: 3D Print Some Succulent Planters

DIY, Just for Funcolleen jordanComment

If you're looking for an activity or DIY project  to make over the long weekend, we've been working on some small desk planters that you can 3D print at home! The planters measure 3" wide and deep by 3" tall, and they're perfect for holding small plants on your windowsill, or also useful as small desk organizers. Print out a few, and you can have a small botanical garden on your desk!

You can find the files for free to download on Thingiverse. If you don't have access to a 3D printer, you may be able to access one at your local library, find a local printer at 3Dhubs.com, or use a printing service such as Shapeways.com.

Make Your Cut Flowers Last Longer

DIYcolleen jordanComment

We're getting through the last few grey days of winter, and I've started bringing in more flowers to take photos with and to brighten up the studio and house before more flowers bloom outside. I've had a few requests lately about how to make cut flowers last longer, and the trick that I use is really simple.

We made these bouquets with stock and wax flowers.

We made these bouquets with stock and wax flowers.

To make my flowers last as long as possible, I cut the end of the stems every two or three days to keep the stems from drying out. I cut at least 1/2" off of each stem which allows the water vessels to keep carrying water up to the flower. Each time I cut the stems, I make sure they have a fresh change of water, and I add a little bit of sugar and apple cider vinegar to the water, about 2 tbsp of each to a quart of water. The vinegar keeps bacteria and mold from growing in the water, and the sugar provides nourishment for plant. Each time you change the water, remove any foliage below the water line and make sure the ends of each stems is covered by at least 1" of water.

Doing this, I can make most of my store-bought flowers last a little more than 2 weeks before they need to be thrown out. This of course isn't the only way to make sure your flowers last as long as possible, but it is what I have found works best for me. Do you have another way of keeping flowers fresh for longer that you like to use?

How to Make a 3D Printed Light-Up Marquee Sign

DIYcolleen jordanComment

Today we wrote a new DIY guide for you! If you like marquee signs, and want to try an easy 3D printing project, we created a tutorial on Instructables for you to make your own 3D printed light-up marquee sign!

This tutorial can easily adapt to your skill level with 3D printing and electronics. If you're a beginner, you can follow the directions to create the sign and learn some new skills. If you already know what you're doing, we show you the basics of this project and give you to improvise to make your sign more complex!

To learn what to do, visit our how-to on Instructables. There are pictures accompanying each step to show you what to do.

Have fun making!

Make your own felt mistletoe

DIYcolleen jordanComment
mistletoe-1-6.jpg

It's the holiday season, which means its time for decorating and bringing some cheer to your house! To start our decorating for the holidays, we decided to make some mistletoe out of felt. If you're looking for a non traditional look, or are worried about allergies, you can make this mistletoe to bring some cheer to your holiday party or decorations! Since this mistletoe is made out of felt, you can keep it to use for years to come.

The traditions around displaying greenery and evergreens indoors around the winter solstice goes back millenia. In the 1st century A.D., the Celtic Druids saw this plant that bloomed and remained green in the cold as a symbol of vivacity and fertility. Overtime, mistletoe evolved into a holiday decoration, with a berry plucked from it every time there was a kiss beneath it. Today we hang mistletoe in our houses as a holiday decoration and to brighten up Christmas parties.

This DIY is really easy to do, and if you have all of the materials on hand, it will probably take you less than 20 minutes from start to finish. If you don't have all of the materials on hand, you can probably find them all for less than $5 at your local crafts store, so it is an inexpensive activity, too. If you're looking for an activity to do with children, this could probably be done by tiny hands, with only minimal help with the hot glue.

Step One: Gather your supplies

To make this felt mistletoe, you'll need:

  • Green and white felt. We used 100% wool felt (also called fancy felt). You might not be able to find this at your local craft store, but you can find it in a large assortment of colors on Etsy.
  • Cotton twine or cord
  • scissors
  • 4"-6" long sticks or branches. We cut ones left over from a flower arrangement.
  • hot glue and glue gun or tacky glue
  • Red or green ribbon to tie the mistletoe together. We used red and white baker's twine since it's what we had on hand, but you can use any ribbon that you'd like.

Step Two: Make your branches

We started by making the branches for our mistletoe. First we glued the branches together to create forking branches and to keep them secure. We finished them off by wrapping the tops of them with the cotton cord. This hides the glue and makes them look more finished.

Step Three: Cut out your leaves

Cut out the leaves from your felt. We cut out leaves in two shapes, an oval shaped one, and one shaped like cat's meow glasses. Don't worry about making the shape of each one perfect. We've included a template for you to see the shape of the leaves that you can print out if you need a guide. We cut out six smaller leaves and one longer leaf per branch, but you can cut out and use as many per branch as you see fit.

Step Four: Glue leaves onto branches

Next, we glued the eyeglass shaped leaves to the end of the branch. Place a drop of glue at the end of the branch, and wrap the felt around the tip of the branch. Pinch the felt and the branch together for a few seconds to secure the bond with the glue.

From there, glue the smaller petals, pointing slightly downward, up the branch. Alternate sides with every other petal. Repeat for each branch.

While working on this DIY, we found some white felt. To make the mistletoe look more realistic, we cut out some small circles from the white felt, and glued them in a few places on each branch to mimic the berries found on some types of mistletoe.

Step Five: Glue Branches Together

Once you've added the leaves to each branch, decide how you want your branches to sit together. We glued them together to secure them in place.

Step Six: Tie ribbon around the mistletoe

You're almost done! Tie your red ribbon around where your branches meet. Et Voilà! You've just made your own mistletoe! Hang it from your doorway, and you're now ready for your holiday party!

If you liked this tutorial, we have more tutorials here on our blog and Instructables page for you to enjoy. We learned about the history of the mistletoe from the Smithsonian magazine and the History Channel.