Wearable Planter

Jewelry and Accessories for Green Thumbs

DIY,DIY

BEER BREAD: SCIENCE IN THE KITCHEN!

DIYcolleen jordan1 Comment

Last week while browsing through Pinterest and Instagram, I came across the completely new to me concept of beer bread. Long story short: you make bread with beer. Despite my love of baking and basic chemistry knowledge, I was fascinated that this is something that exists, and that it is easy to make. Surprisingly all of the ingredients were already in my refrigerator and I got started on trying this baking experiment.

I'm not entirely sure of the chemistry behind it, but my loose understanding of beer bread making is that when yeast (from the beer) meets up with the baking powder and the starches in the flour, the dough starts to rise and leaven. There's no kneading involved or having to wait for yeast to rise, so this is really easy to make, plus its fun to watch the dough start to bubble and foam when you pour in the beer!

How You Make It

What You'll Need:

3 Cups all purpose flour
1 Tablespoon Sugar
1 Tablespoon baking powder
1 Teaspoon Salt

12 fluid ounces (your typical glass bottle) of beer, I used Sweetwater Whiplash.

What To Do:

Set your oven to 375°. In a large mixing bowl, mix the flour, sugar, baking powder, and salt and stir them together well. Slowly pour in the beer and mix it into the batter while being amazed by the science happening in front of your eyes! Pour the mixture into a greased 8"x4" baking pan and bake for 45-55 minutes. Poke with a toothpick to see if your bread is done. If the toothpick comes out clean, your bread is ready.

I baked this late at night, so I don't have any good pictures of the making process to share. The beer I used is a seasonal brew from Sweetwater, a Belgian IPA, but you can use any beer that you have available.

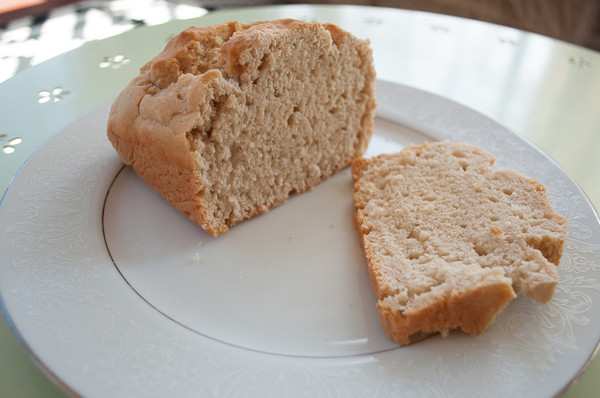
The bread came out delicious, and I can't wait to eat more of it and try other variations on the recipe. Next week I'm planning to try it with rosemary and other herbs from my rooftop garden. Hopefully I'll be able to post pictures of the making process next time!

Hat tip to the blog Farm Girl Fare for showing me what to do!

VISITING CHICAGO'S 3D PRINTER EXPERIENCE

Just for Fun, DIYcolleen jordanComment

Last month I travelled to Chicago, and while I was there I decided to check out their new 3D Printing store, The 3D Printer Experience. By their name, it's pretty obvious what they do. I'd seen some of stuff they've made on social media, and wanted to give them a visit in real life.

Part of their store is dedicated to a small gallery space where they showcase 3D printed products and art. On display were pieces by Sophie Kahn and other artists and designers working with this medium. In the photo above, you can also see a Buddha statue there alongside it's colorful copy that was recreated digitally.

They also do more though than act as a storefront for goods made on demand. The store also offers modeling classes, printing services, and you can even scan yourself and create a printed bust. One of the coolest parts about the store is that they have a wall of 3D printers of all makes and models. You can learn about the different types of printing technologies and see what you're making materialize before your eyes.

During my visit, I opted out of getting my head scanned and turned into a bust, but I did use their machines to print out one of our new bike planters. They have a plethora of plastic colors to choose from, and being someone who likes bold color choices, I knew I'd come to the right place. Unable to choose just one color, I printed my new bike planter out in about 7 colors.

We printed the planters out on their MakerBot Replicator 2 in PLA, a biodegradable plastic made from corn starch. Objects made in this material won't last forever, but they will last a long time. When you're done with them you can compost them, and the material is renewable. 

Later in my visit I got the chance to borrow an adorable city bike made by another Chicago company, Heritage Bicycles from my hotel and take my new planter out for a test drive!

If you want to learn more about 3DPX, visit their website or follow them on Twitter.

BIKE PLANTERS ON THINGIVERSE

Announcements, DIYcolleen jordanComment

Our original Bike Planter, initially designed for the Sopo Bicycle Cooperative (a non-profit, community-based bicycle repair shop in Atlanta, GA) Art Bike Show, is now available on Thingiverse! You can now 3D-print your very own Bike Planter on your Makerbot or RepRap. While such a large print would be too costly to offer for sale, this design is perfect for at-home printing. Simply add 3mm elastic cord and attach directly to your bike for an awesome way to take your greens wherever you go! 

2.jpg

If you want to print your own bike planter, you can find the files on Thingiverse.

HOW TO DYE YOUR 3D PRINTS

DIY, What We're Makingcolleen jordanComment

3D printing is currently a big buzz word in the design, arts and crafts, and technology worlds. We make all of our jewelry with 3D printing, and in the time we've been make 3D printed creations, we've learned a lot about ways to manipulate the material to change its color and appearance. 3D printing is also known as additive manufacturing  and produces objects from CAD files by building up material layer by layer to create the final form. You can 3D print in a wide range of materials from squishy rubber to hard metals. 

Have you created something with 3D printing? A lot of design students and hobbyists now have access to the technology thanks to 3D printing services like Shapeways and Ponoko. If you printed your object in polyamide, you can dye them at home to whatever color you want. Polyamide is a porous material that accepts color really well. Some companies offer dying of your prints for you, but that adds extra processing time and is only available in a small range of colors.

If you're tired of the boring white that many 3D prints come in, we will show you how to add color to your prints. This is a tutorial for dying nylon (or polyamide) 3d prints with fabric dye. This material is known by different names at different printing companies. Shapeways calls it White Strong and Flexible, Ponoko calls it Durable Plastic, Sculpteo White Plastic, and iMaterialise Polyamide. We'll use Rit brand dyes in our tutorial since it is easy to find in craft, fabric, and grocery stores. You can also dye your 3D prints with Jacquard brand acid dyes in a similar process, but that will require carefully measuring vinegar to change the acidity of the solution and constantly heating the solution.

This process is similar to dying fabric with, and we learned a lot about how dye 3D prints by reading this article on dyeing techniques by Rit.

Step 1: Gather Your Materials

The first thing that you will need to do is gather your materials. You'll need your nylon 3D prints, your desired color of fabric dye, a bowl to do the dyeing in, measuring spoons, and boiling water (not pictured). We also recommend having access to a microwave to reheat your solution while dying as need.

Decide which color you would like to dye your prints. Rit has a great guide to tell you which colors you can dye your prints with their dyes and other brands of dye will have similar guides. Nylon absorbs the dye really quickly, and we usually use slightly less dye than the guides recommend. For this batch of bike planters we will be dying them using Rit's Sunshine Orange. We're using 1.5 tsp of powdered dye to 1.5 cups of boiling water.

Remember that you are working with fabric dye that will stain clothes and shoes. So if you care about the clothes that you are wearing wear an apron or change into something that you don't love so much. Fabric dye can also stain your skin, so wear latex gloves if you don't want tinted hands. Rit dye will come off easily with scrubbing, so if you do get some on your skin, it can be easily removed.

Step 2: Soak Your Pieces

3.jpg

Before you begin the dying process, soak your prints for at least 30 minutes. We recommend doing this overnight if you have the time. Having your prints saturated will allow the dye to color the piece more evenly. This will also help remove any dust on the surface of your prints left over from the printing process. If there is residual powder on the surface of your prints, it will affect the color of piece. The powder will be dyed, and will come off easily when the piece is dry, leaving a white spot underneath.

This piece had some leftover powder stuck to it when it was dyed, and you can see the large white area left behind from removing the powder.

Step 3: Add Color

Carefully measure your required amount of dye and add your boiling water. Stir it really well so all of the powder is dissolved in solution.

Add your prints to the the solution and stir. Agitate the solution frequently to ensure that your prints are colored evenly. The longer that you leave your prints in the solution, the more saturated the color will be. These prints stayed in the dye for about 6 minutes to achieve the color. If you need to leave your prints in the solution longer, microwave it at 15-30 second increments to reheat the water to near boiling temperatures. We've noticed that some dyes require higher temperatures to stay in solution than others. In our experience pink and blue dyes require hotter temperatures and longer dying times to achieve their desired colors.

Step 4: Rinse 

8.jpg

Rinsing your prints is very important. You can rinse it with cold water to remove the excess dye. We also like to let the pieces sit in boiling water for a few minutes for any excess dye to soak out. If you're going to be dying jewelry or anything that will be worn close to the skin, this is a very important step as excess dye could stain the skin or clothes.

Step 5: Dry

Step 6 (Optional): Seal

Nylon is a porous material that will readily absorb particles and dirt it is exposed to. We recommend sealing your prints with a polymer varnish (like liquitex) or clear acrylic paint to protect the color and your piece from getting dirty.

Step 7: Show it Off!

 You just put all of this hard work into your 3D Printed object- show it off and tell everyone about it!

MAKE YOUR OWN SEED BOMBS

DIY, What We're Makingcolleen jordanComment

Seed bombs have become very popular recently. They're a fun way to try your hand at gardening without a lot of prep work. Making them is a fun activity that you can do to welcome in spring and is great to do with kids.

These seed balls are made with recycled and biodegradable paper and wildflower seeds. We receive a lot of kraft paper in shipments from our suppliers, and we needed a creative way to reuse it. The paper around them protects them from being eaten by birds and insects while the seeds germinate. Throw them in a space that you think needs some greenery, or in your own yard to start a small garden.

Step One: Gather Supplies and Tools

To make seed bombs, you'll need to first gather your supplies and tools for the job. You'll need:

Recycled Newspaper or kraft paper

water

seeds

mixing bowl

blender or immersion blender

ice cube trays

tea towel

A tray or plate for the seed balls to rest on while they dry

Seeds can be expensive if you buy them in small packets. If you're planning on making more than one batch of these, we recommend buying them online from a store like American Meadows

4.jpg

Step Two:

Shred paper and let it soak in water for 5 minutes or more. This allows the fibers in the paper to absorb enough water to lengthen so it is easier to blend. Add the paper and water mixture to the blender and blend it into a pulp.

Step Three:

Add the seeds to the pulp mixture and stir. To make ours we use a blend of wildflower seeds, but you can use any type of seeds you like, like vegetable seeds or ivy. There's no exact measurement for the amount of seeds you need to use, but we use about 1/4 cup of seeds to 4 cups of the paper pulp mixture.

Step Four:

Strain the pulp through the tea towel. We put ours over a separate mixing bowl to reuse the water to create a second batch later in the day. Wring out the pulp mix in the tea towel to remove more water so the seeds don't germinate prematurely.

Step Five:

Place the paper and seed pulp into your molds. You can make your seed balls as small or as large as you like. Carefully remove from their molds and rest them on a tray or board to dry.

9.jpg

Step Five:

Let dry in a warm and sunny place. You want to make sure that your seed bombs dry quickly so that the seeds don't start to germinate while your seed bombs are still drying.

10.jpg

Step Six:

Spread! Throw your seed bombs in your garden, on your windowsill, or in an ugly lot that you think needs some color.

PROTOTYPING WITH MAKERBOT

DIY, What We're Makingcolleen jordanComment

In our studio, we have a MakerBot Thingomatic that is used to prototype new products. The objects that we create on it are not production quality, but they help us get an idea what a final product will look and feel like. We created a time-lapse video of the bot in motion to give you a better idea of what it does and how 3D printing works. The movie doesn't have any sound, and I wish that I could share with you the cute little electronic chirping noises the machine makes.

One of the neat things about 3D printing is that I was able to print an iPhone mount from Thingiverse to capture this process. We didn't end up using the iPhone footage because of video compression issues, but if you don't have access to a camera, using your phone is still a great way to create a timelapse video.

In the video our bot is making a small desktop planter that we would like to print in ceramics. We printed this prototype to see if this size planter would comfortably hold a larger air plant. While the machine we use to prototype with is far from perfect, it's a great low cost and quick way to get a feel for new objects.

If you have a MakerBot or access to a 3D printer, you can check out our Thingiverse page and download some of our files to print for yourself.