

Good news! We're sharing all of our DIYs and tutorials at a new place online, Instructables. Instructables is an online community for makers who want to learn anything from how to hem pants to baking a cake to fixing their car. Don't worry, we'll still be publishing all of our DIYs and tutorials here. Instructables has something that a lone blog can't offer, a supportive and social community where discussions about how to make things better take place, and a larger audience for sharing knowledge.
DIY,DIY
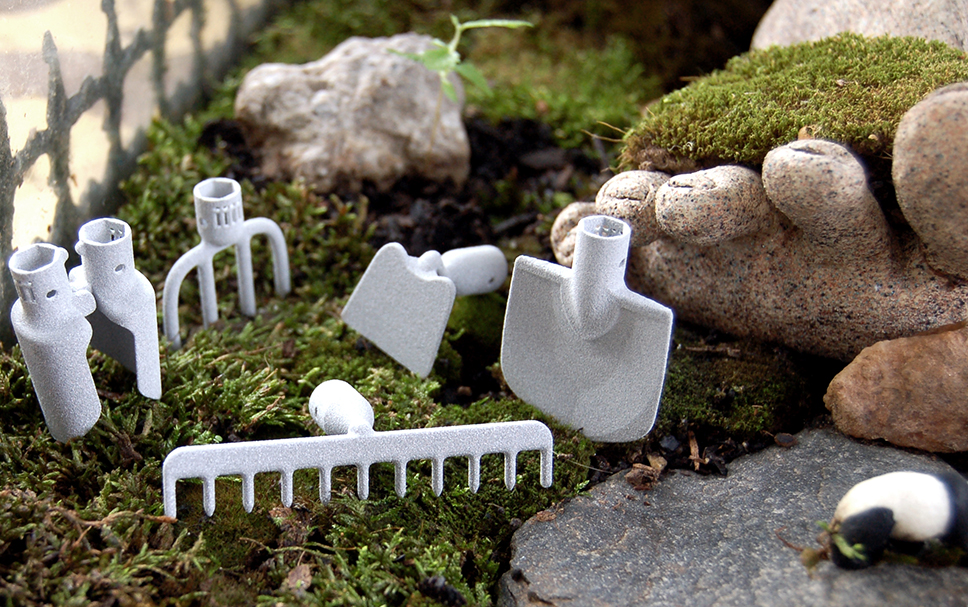
Things We Love: 3D Printed Desktop Gardening Tools
Just for Fun, DIY1 Comment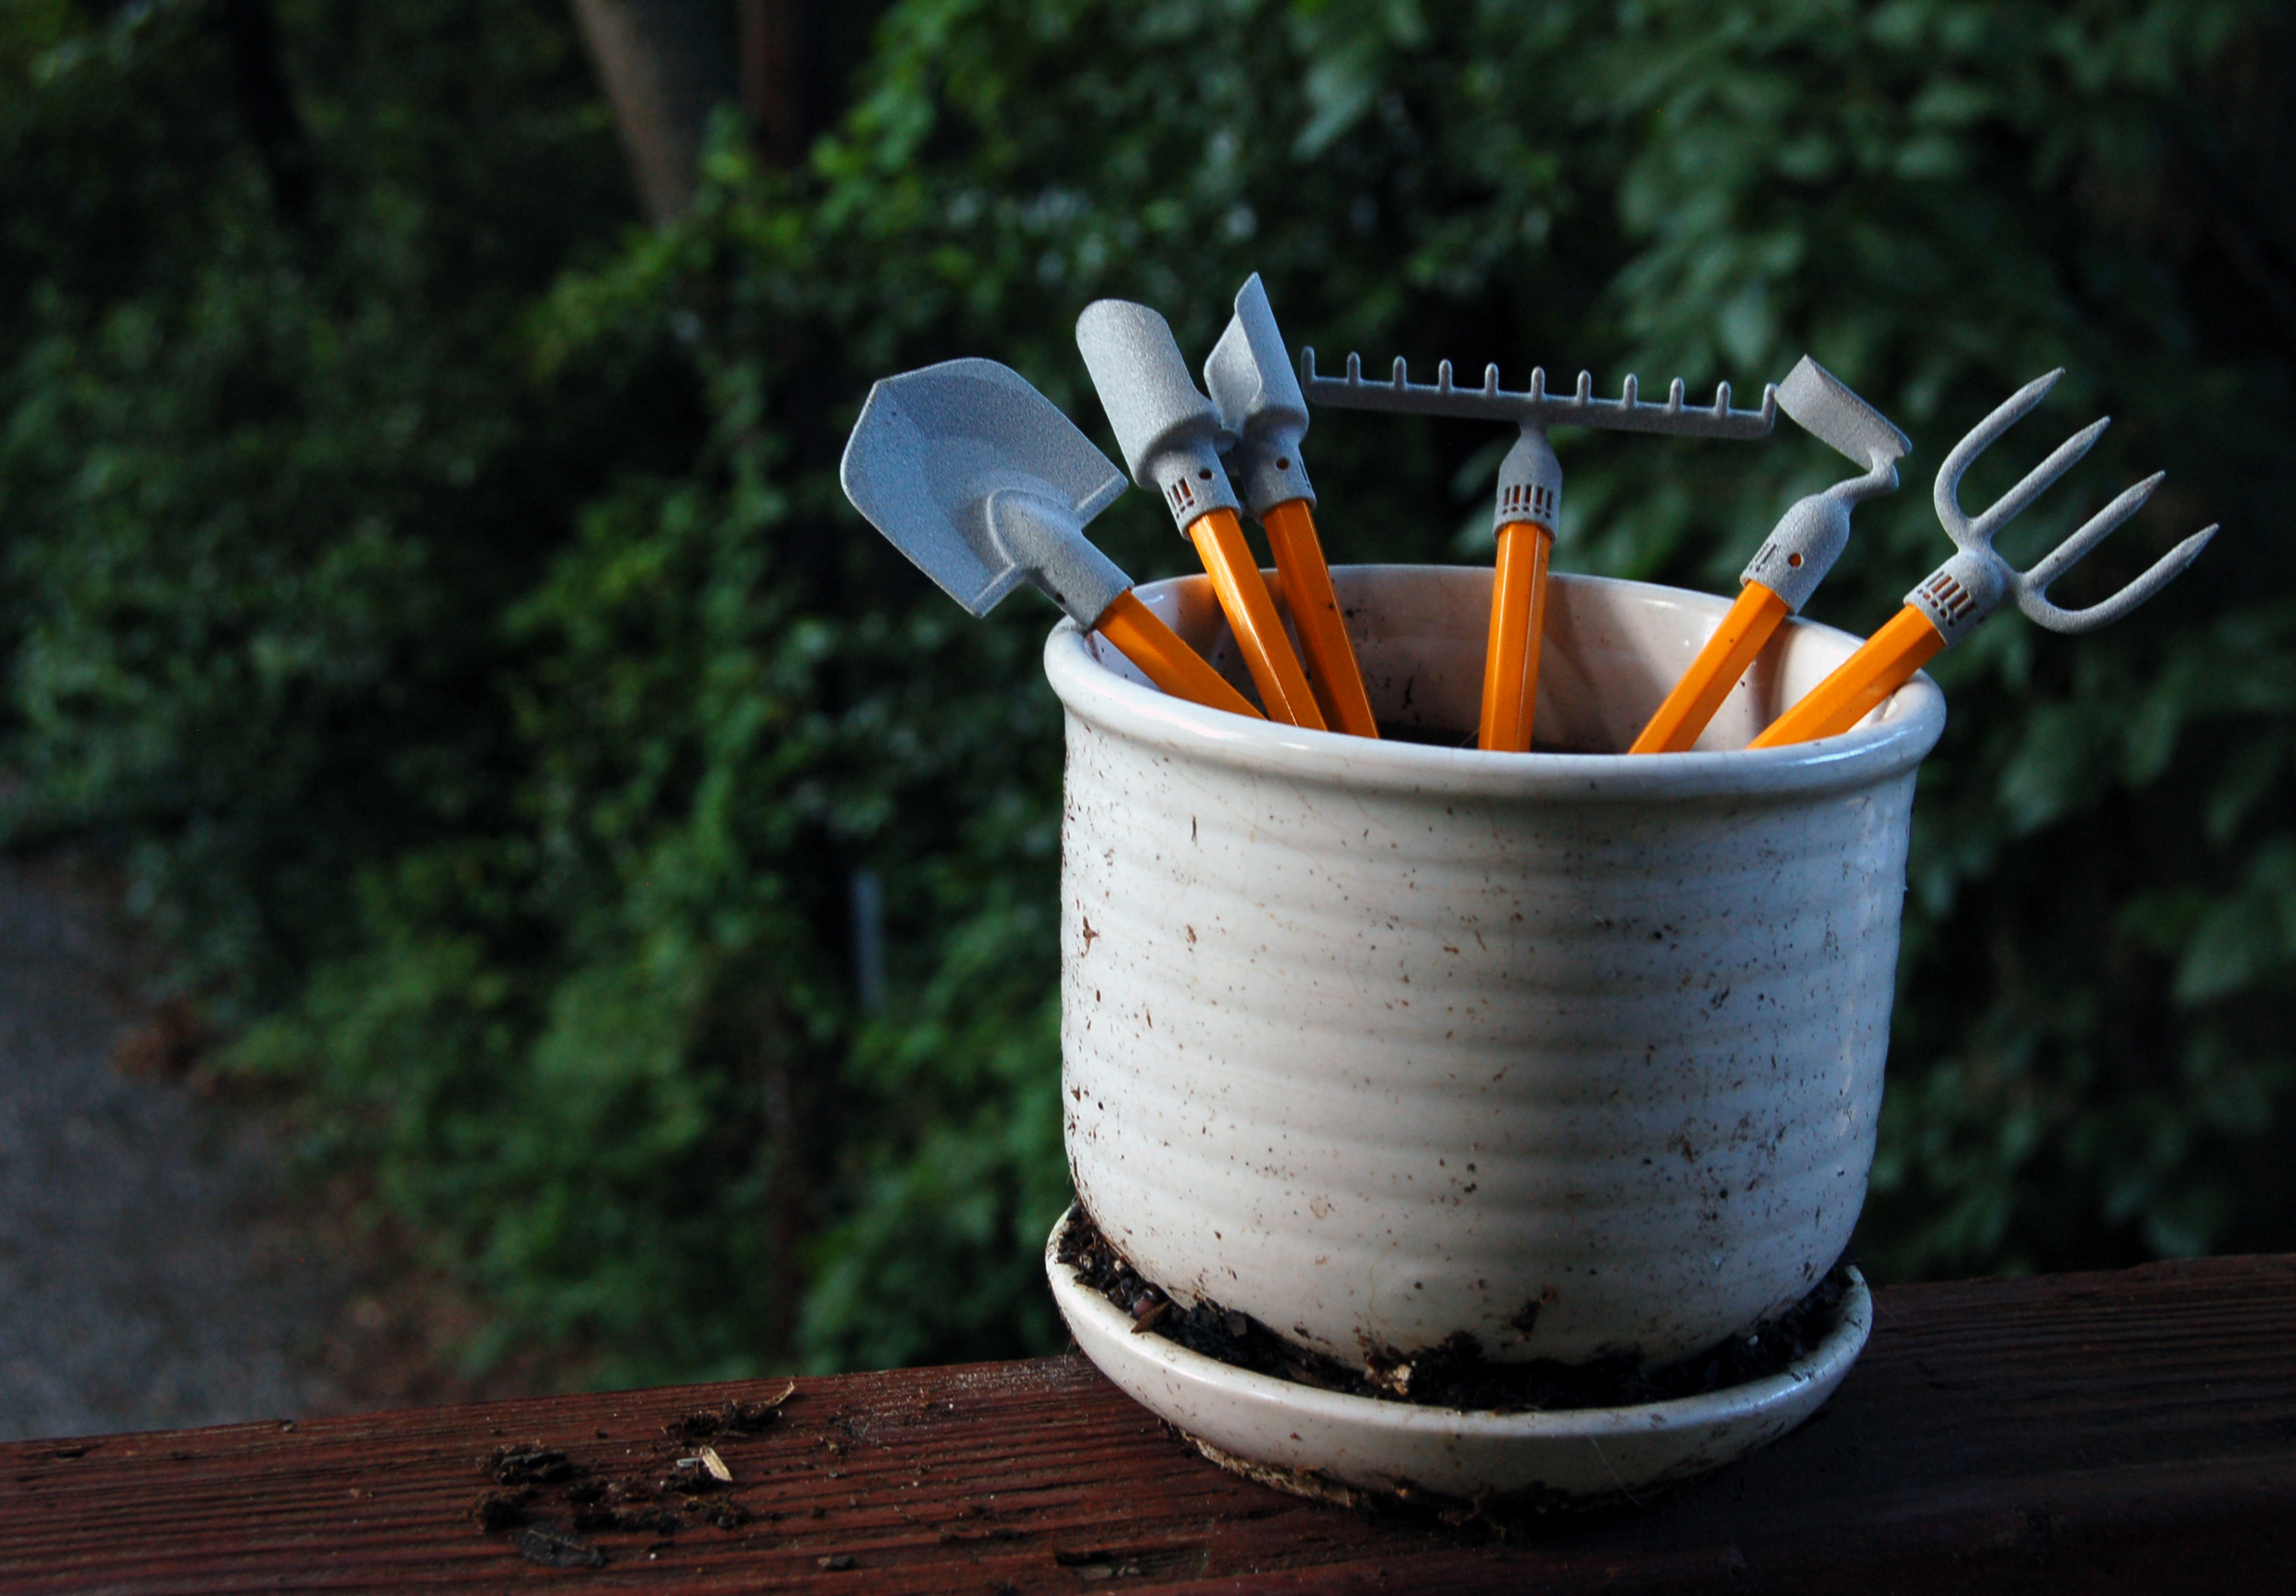
Some things just make me smile when I see them, and these desktop gardening tools from Trisha Bell just make me so happy to see! The small tools snap onto the top of a standard pencil, and they're ready for you to tend to your bonsai tree or desktop zen garden. If you want to make your own, you can download them to 3D print from her Thingiverse page.
Trisha Bell is also a collaborator for Oscar Eastwood, and will be displaying her gardening tools and other 3D printed objects at Atlanta Maker Faire.
Prototyping with MakerBot
DIY, What We're MakingComment
Planters prototyped in warm grey PLA hold rosemary from our roof garden.
We've written before about prototyping with MakerBot and other home 3D printers over the last two years. For the planters that we sell here on our site and on Etsy, we prefer to use commercial 3D printers like Shapeways and Ponoko, but for prototyping, using a desktop 3D printer better suits our needs. Prints can be made in less than an hour (no waiting for a week for prints!), and I can immediately make changes to file if I see a change that needs to be made.

Printing on the Makerbot Z18.
We've been lucky the last few weeks to have access to a MakerBot Z18, the newest of their series, to prototype some of our new forthcoming planters. Before we've printed on their Thing-o-matic and Replicator 2 Machines. The print quality has improved slightly from the earlier models, which is helpful when prototyping small pieces. The main changes with the newer MakerBots is the interface is much more intuitive to use, and now they're capable of printing much larger pieces.

Made with purple PLA.
Also, these planters were printed in PLA, a plastic made from cornstarch. The material is biodegradable over time, but can warp when exposed to heat, making this material suitable for use for prototyping.
Making and 3D printing on a MakerBot still isn't perfect, but its pretty amazing when you can hold a physical product in your hand that only existed on a computer screen hours before!
Want to see more of what we're making? Follow us on instagram to see our latest projects and experiments.
Printable DIY: Bookmarks for Summer Reading and Back to School
DIY, Just for FunComment
This week I worked with my friends Trisha Bell, Tyna Kachnic, and Christina Mayo as part of our collaborative group, Oscar Eastwood, to create a series of fun bookmarks to brighten your reading. The timing of this project happens to coincide with the first week back to school for children in Georgia and the Southeast, but whether you're reading for school or fun, you can print out and make these bookmarks to mark your pages.
You can find this project along with some bookplates to download on Oscar Eastwood.
Make Your Own String Art
DIYComment

Step 1: Gather Your Tools and Materials
Gathering your tools is always the first and most important step of any DIY project. For this project you're going to need:
- a wood board or plank
- masking tape
- a hammer
- a lot of small nails (you'll need at least 100. For two signs we used 3 packs of XX nails)
- embroidery floss, yarn, or thread (we used embroidery floss)
- Access to a computer with a printer and Adobe Illustrator (optional, but highly recommended)
- Optional: Paint pen (to paint the tops of nails)

Step 2: Outline Your Sign
Whether you're making a sign with text or an image, you'll want to outline your sign first. For this I used Adobe Illustrator, but you can use the vector image software of your choice, like Inkscape.
First I outlined my words with a thin black line. I made a copy of that text over the first version, made it into the dashed line to mark where the nails should be. This step is optional, but will save you a lot of time in determining where your nails should be placed. Once you're happy with your image or text and nail outline, print out your file.
Step 3: Tape your Overlay Onto your Sign
Tape your printed overlay onto your sign. We used masking tape to hold the printed overlay in place. Nail your nails into the marked points on the sheet.

Step 4: Riiiiiip
Rip off your stencil from the board. This step is really satisfying. Don't worry if there are any small bits of paper left, you can remove those with tweezers. If they're left they won't really be visible in the final project.

Step 5: Outline your letters
For each letter, start by tying a double knot around one nail of each letter.

Next wrap around the outline of the letter.

Fill in the letter by zig-zagging through he points in the letter. Do this until it looks complete or thick enough to you.
Tie off the string for that letter with another double knot. Cut off any excess string. If you have a paint pen in the same color as your string, paint the tips of the nails to make your sign more legible or "pop" more.
Repeat this process for all the letters or images in your sign. You're probably going to be looking at the sign from a few feet away, so don't stress out about every detail of this being perfect. Embrace your mistakes!

Step 6: Show off your work!
Congratulations! you've finished this (moderately time consuming) DIY project, so show off your work! We added hooks to the back off our sign and nailed it to the wall, but this craft could be displayed on a bookshelf or countertop, too.
NATURALLY DYED EASTER EGGS
DIYComment
Easter is coming soon, and to get ready for the holiday, we dyed eggs with natural dyes and colorings. We liked the results that we got, and we thought that this is a craft that many of our readers might like to try. Dyeing eggs this way gives you more muted colors than commercial dyeing kits and is a fun craft to get you in the spirit for Easter. For this we used hard boiled eggs, but you can use hollowed out eggs if you like.
We tried a lot of different combinations to make dyes, and we got some great results and some that did not impress us. This is not all of the combinations of natural egg colorings you can create, but these are the dyes that yielded good results for us. This is in no way all of the dyes you can make, but is a good introduction to this springtime craft that is sure to amuse kids and anyone interested in homemade crafts.

None of our recipes use exact amounts, so play around with ingredients that you have on hand and in amounts you feel comfortable using.
Yellow Gold: In a small pot filled with water, add a splash of vinegar and about 2 tablespoons of turmeric. Boil the mixture for 5 minutes. After the mixture has cooled down, add your eggs for at least 30 minutes to dye to a yellow/ light gold color. The longer you leave the egg in the dye, the bolder the color will become.
Purple: Soak eggs in cranberry juice for 15-30 minutes. The sugars in the juice soften the outer layers of the egg shell, so be careful when you remove the egg from dye so you don't scratch the coloring. This will harden again as it dries.
Bright Blue: This was my favorite result from dyeing the eggs, but also the smelliest dye to make. In a pot of water, add some shredded red cabbage and a splash of vinegar. Boil the mixture for 5-10 minutes. The dye that you will get from this will look purple. Once the mixture has cooled, strain out the cabbage and your dye will be ready to use. Add your eggs to the dye, and let it sit overnight to get the bright blue color.
Dark Purple: Soak eggs in blueberry juice for 15-30 minutes. Like with the cranberry juice, the sugars in the juice soften the outer layers of the egg shell, so be careful when you remove the egg from dye so you don't scratch the coloring. This will harden again as it dries.

There are also more ingredients that may already be in your kitchen that you can use to make dyes. Coffee, spices, and vegetables can be used to color eggs, and you may already have these ingredients on hand. You can also color eggs in multiple dyes to create bold color combinations. For more information on how to dye natural Easter eggs, you can check out the Martha Stewart blog where we got the inspiration to try this craft. Go have fun dyeing Easter eggs, and in the words of Ms. Frizzle "Take chances, make mistakes, get messy!"